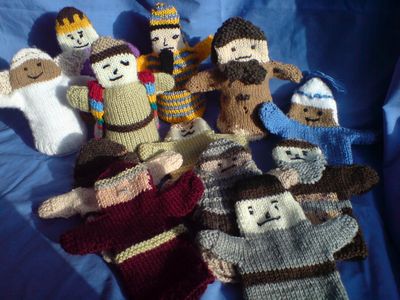
Would you like to be part of our project to knit hand-puppet Bible
figures for Seal School and Seal church Sunday school? These will
not
only help teachers tell Bible stories, but also let children
explore
the stories in play.
We
need a wide variety of figures – rich and poor, heroes and
villains,
men and women, Old Testament and New Testament – so that we can
tell
the whole gamut of wonderful stories the Bible contains.
The
basic pattern below is the same for all characters, but you can
adapt
it in many different ways. The puppet should end up as slightly
too
small for an adult hand so that children can comfortably use it.
Use
smaller needles if you think your puppets are too large or
decrease the
total number of stitches/rows to suit.
If
you want to turn the glove puppet temporarily into a free-standing
figure, just put it over a plastic cup so it stands up by itself.
If
you would like to knit these figures for Seal School or Seal
Sunday
School, please either bring them to the church or send them to me.
If
you want to knit these for another church or project, or you have
children or grandchildren who
you think might appreciate these puppets, please feel free to use
these
patterns and ideas as you wish. This page can also be downloaded
as
a leaflet to print out.
HOW DO WE USE THESE PUPPETS? We sometimes use the
puppets as visual aids while telling a Bible story, but they are
deliberately sized to fit a child's hand so that the children can
play with them to explore the story they relate to. I often give
out puppets as I tell the story, and the children then
spontaneously join in. They can then use them afterwards to recall
the story and talk about it, and it's fascinating to see them
talking to the puppets, expressing their feelings and thoughts to
them or wondering about their story. We also put them in our pew
bags, which children can take to their seats during services -
they tend to go missing fairly often, but we console ourselves
with the thought that there are children out there who have a
Biblical friend at home!
Revd
Anne Le Bas,
BASIC
PATTERN 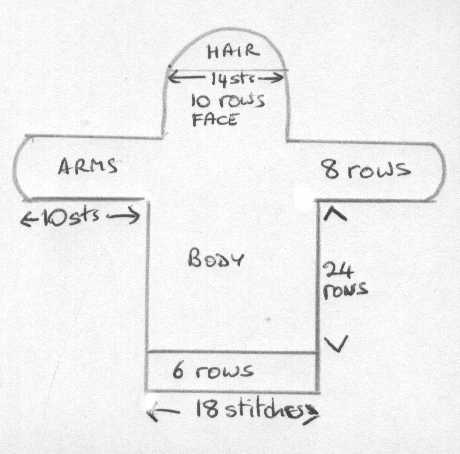
FRONT:
Body:
Using
double knitting wool and 3.75 needles cast on 18 stitches.
Work
6 rows of knit 1, purl 1 rib.
Work
24 rows of stocking stitch (knit 1 row, purl 1 row).
Arms
Cast
on 10 stitches at the beginning of the next row (for the arm),
knit
back along the cast on stitches and across the main body of the
work to
the end of the row (28 stitches)
Turn
and cast on 10 stitches at the beginning of the next row for the
other
arm. (38 stitches)
Knit
4 stitches, purl 30, knit the last 4 stitches.
Next
row: Knit
Work
8 rows in total for the arms, always knitting the first and last 4
stitches (for a “finger” effect)
Cast
off 12 stitches at the beginning of the next 2 rows.
Face
Join
on “flesh” coloured wool and work 10 rows in stocking stitch.
Hair/
Headdress
Join
on “hair” or “headdress” wool and work 2 rows (see note below
about the
types of stitches to use for hair and headdresses)
Reduce
by one stitch at the beginning and end of next row (K1. Sl 1.
psso,
knit to the end, K to tog.)
Purl
next row
Repeat
these two rows until 10 stitches remain, then reduce one stitch at
each
end of every row until 2 stitches remain.
Cast
off.
BACK: Work as
for front until you
reach the face. Then join “hair” or “headdress” coloured wool and
work
the back of the head in this colour.
Embroider
features on face – it is probably better to keep them fairly
neutral,
as a character in a story might go through lots of emotions! You
can
embroider on any other embellishments you wish – crowns, belts,
swords
– or you can knit these as you go if you prefer. Please make sure
anything sewn on is firmly attached!
Sew
the two pieces together and weave in any loose ends.
VARIATIONS
This
is where the fun begins! You can use your own imagination and
ingenuity
for this, but here are some suggestions which Nicky and I have
come up
with.
Hair and beards.
Work in garter
stitch (every row knit) or reverse stocking stitch ( purl 1 row,
knit 1
row, but with “knobby” side on the outside.)
 Headresses. These
can be one colour
or striped, or textured with the occasional purl row. You can knit
these as a part of the basic puppet, or you can knit a “cap” with
coloured wool from the point where the decrease for the head
starts,
and then knit a separate rectangle of wool to attach at the back
over
hair (see the photo of the back of the woman). Grey wool
makes a
helmet, and “chin straps” can be embroidered.
Headresses. These
can be one colour
or striped, or textured with the occasional purl row. You can knit
these as a part of the basic puppet, or you can knit a “cap” with
coloured wool from the point where the decrease for the head
starts,
and then knit a separate rectangle of wool to attach at the back
over
hair (see the photo of the back of the woman). Grey wool
makes a
helmet, and “chin straps” can be embroidered.
Cloaks for
kings etc. can be made
separately and sewn on. Knit a rectangle (cast on 14 or so
stitches and
work to required length in whatever stitch you want to use to
create
the effect you are after)
Flesh: can be
any colour from pale
cream to dark brown.
CHARACTERS: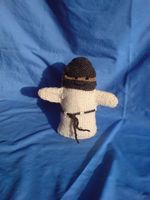
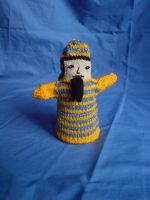
Generic men
(inc. Jesus, disciples,
Joseph etc.): Plain “robes” with or without belts (either a
knitted stripe halfway up the body or a separate cord sewn on
afterwards). Bright colours suggest wealth (can also be striped,
include gold borders etc) Neutral colours suggest more ordinary
people.
Grey/white hair for old men. Beards and long hair for Jewish men .
Romans tended to be clean shaven with short hair.
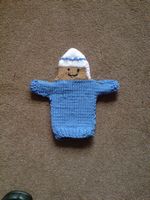
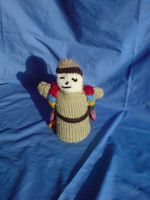
Generic women: plain robes (again colour signifies
social
status). Headdress - either knitted in place of hair, perhaps with
a
row or two of hair below headdress, or knitted separately and
attached
at the back (See pic)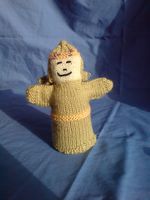
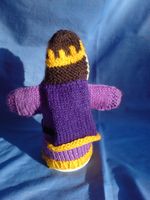
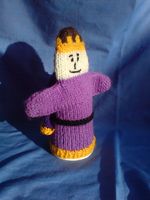
Kings: Bright
colours. Cloaks.
Crowns. Glittery thread.
 Mary: blue
robe and white headdress. She wouldn’t actually have worn these
colours
of course – she was far too poor to be in such bright colours, but
that
is how she is often portrayed in Christian art, so it makes her
instantly recognisable.
Mary: blue
robe and white headdress. She wouldn’t actually have worn these
colours
of course – she was far too poor to be in such bright colours, but
that
is how she is often portrayed in Christian art, so it makes her
instantly recognisable.
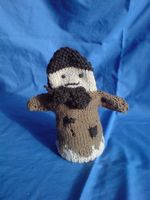 Beggar: Cast on in
flesh colour and
then knit “ragged” border to robe in brown. Knit occasional
patches of other colours, and knit a few holes at random here and
there!
Beggar: Cast on in
flesh colour and
then knit “ragged” border to robe in brown. Knit occasional
patches of other colours, and knit a few holes at random here and
there!
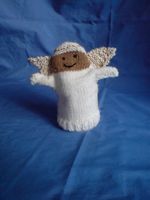
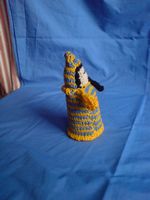
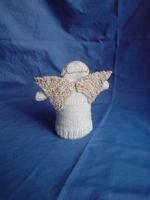 Angel: Robe in white, silver
or
gold. I knitted white wool and a thin gold thread together for
angel’s
hair and wings.
Angel: Robe in white, silver
or
gold. I knitted white wool and a thin gold thread together for
angel’s
hair and wings.
Wings
– cast on 14 stitches. Work in garter stitch, decreasing 1 stitch
at
each end of every 4th row till one stitch remains. Make two
wings
and sow onto angel’s back (see picture).
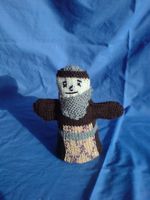
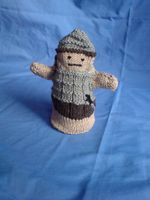 Roman soldier: Work
about
4 rows stocking stitch in flesh colour after the ribbing. Change
to
“tunic” colour and work 6 rows. Change to grey (Armour). Work two
rows
of garter stitch then continue in the following pattern
Roman soldier: Work
about
4 rows stocking stitch in flesh colour after the ribbing. Change
to
“tunic” colour and work 6 rows. Change to grey (Armour). Work two
rows
of garter stitch then continue in the following pattern
Rows
1-3 : K 3 P1 rib
Row
4 : Knit all stitches.
This
should give you the effect of plates of armour joined together
(see
picture)
Continue
this pattern until arms.
Cast
on and work arms in flesh colour, but continue to knit armour on
torso,
winding flesh and grey wool together at the join.
Helmet:
shape as for hair/headdress in basic pattern but after every three
rows
of stocking stitch work a row of knit instead of purl, to give
impression of ridges on helmet.
Embroider
“sword” onto bottom of armour.
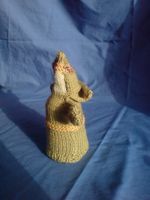
 Pharaoh/Egyptians
White
or striped robe and headdress (can have glittery thread woven in.)
Black hair. Black eyes, outlined. Small black beard, made from
small
square of stocking stitch, folded into a tube. Sew top of tube to
face
and let the bottom end curl up naturally)
 Joseph
This
figure (right) has a removable “coat of many colours”but you could
knit
the body in stripes instead.
For
updates and more pictures of figures as we make them, please check
on
the church
blog
here.
…
and I am sure you can think of many more. Over to you…
Revd.
Anne Le Bas
The
Vicarage, Church Street, Seal, TN15 0AR.
priest@sealpeterandpaul.com
Figures
in this pattern have been knitted by Anne Le Bas and Nicky Harvey.
The
basic pattern is adapted from one developed by “Operation
Christmas
Child.”
http://www.operationchristmaschild.org.uk/knitting-patterns